In this chapter, you’ll learn about all the necessary steps to get the asset up and running. We’ll also take a quick look at the Creator Asset itself. In addition to the written steps below, I recommend giving the video a watch if you find yourself stuck.
Setup & Introduction
Documentation: Pixel Character Creator 2D
Table of contents

1.1
Importing the package
Note: For demonstration purposes and to avoid confusion, I will create a new, empty project and showcase the asset there. If this is the first time you use this asset, I recommend you try out this asset in a new, empty project as well. That way you can learn how this tool works without accidentally breaking something in your own game.
If you downloaded the Pixel Character Creator 2D from the Unity Asset Store, you can import the asset by performing the following steps:
Step 1.
Open your (newly created) Unity project.
Step 2.
Open the Package Manager
Step 3.
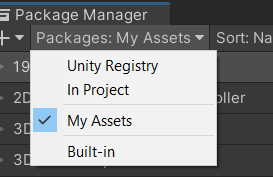
At the top of the window, click “Packages:”, then select “My Assets”.
Step 4.
Look for the “Pixel Character Creator 2D” asset in this list, then click import.
Step 5.
Decide what you want to import. I recommend importing everything if
you created a new Unity project so you can learn the tool with the help of
demo files. If you’re importing this asset into your own game, you may
want to exclude the demo files.
If you got the Pixel Character Creator 2D from Itch.io, these are the steps you can follow to import the asset:
Step 1.
Open your (newly created) Unity project.
Step 2.
Navigate to the directory where you stored your download.
Step 3.
Drag the .unitypackage file from your directory into the project tab. Alternatively, you can right-click in the project tab, select Import Package > Custom Package…, and search for the .unitypackage file.
Step 4.
Finally, decide what you want files you want to import. It is recommended to import everything if you just created a new Unity project. This way, you can learn how to use the tool with the help of the included demo files. In case you’re importing the Pixel Character Creator 2D asset into your own game, you may want to exclude the demo files.
1.2
Texture Importers in the Preset Manager
The Preset Manager is a great tool to automatically set import settings for certain file types. For this asset I used it specifically with Texture Importers, These Texture Importers ensure that all the .png files we create for the character have the correct import settings upon creation. Follow the steps below to set the manager up properly. Failing to set up the manager correctly will result in errors upon exporting your character. (You can click the images to get a zoomed-in view)
I won’t go into detail about how the Preset Manager works, but I do recommend you read the official Unity Documentation about this topic if you are interested.
Setup method 1: Selecting a pre-made .preset-file
Setup method 1 is the fastest way to set up the Preset Manager. Using this method may be beneficial if you are not using the Preset Manager for any other purpose. However, if you are using the Preset Manager for other purposes, you may want to go for the 2nd setup method to avoid accidentally resetting your own settings.
Step 1.
In the top bar: go to Edit > Project Settings > Preset Manager.
Step 2.
In the Preset Manager window, click the “Select Preset” button in the top-right corner. This is what the button looks like: ![]()
Step 3.
With the “Select Preset” pop-up window opened, select the already existing PresetManager file. Your Preset Manager Window should now match the example below. We’re now done with the Preset Manager.
Setup method 2: Manually adding Texture Importer .preset-files
This setup method is generally the safer route if you wish to keep any existing presets you already placed in this manager. While taking a little longer, setting up the Preset Manager via this method will most likely only take a few minutes.
Step 1.
In the top bar: go to File > Project Settings > Preset Manager.
Step 2.
In the Preset Manager window, click “Add Default Preset”. Look for “Texture Importer” in the search bar and select it. Your Preset Manager should now look like the screenshot below.
Step 3.
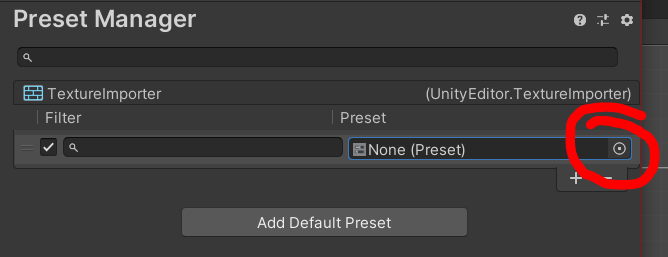
Click the white dot I’ve marked with the red circle in the screenshot. Then select “CharOverheadExpSettings”.
Step 4.
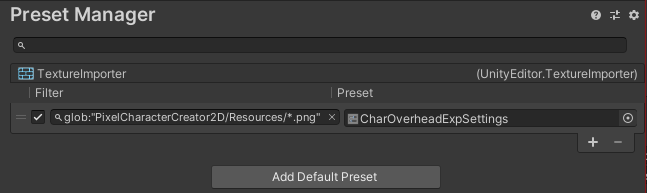
Paste the following path into the Filter field next to the Preset field:
glob:"PixelCharacterCreator2D/Resources/*.png"
Your Preset Manager Window should now look like this:
Step 5.
We now have to add one more Texture Importer. Click on the + icon to create another row. Then click the white dot again. This time, select “CharSegmentOverheadExpSettings”.
Step 6.
Paste the following path into the Filter field next to the Preset field:
glob:"PixelCharacterCreator2D/OverheadViewCharacter/Templates/TemplateSprites/*"
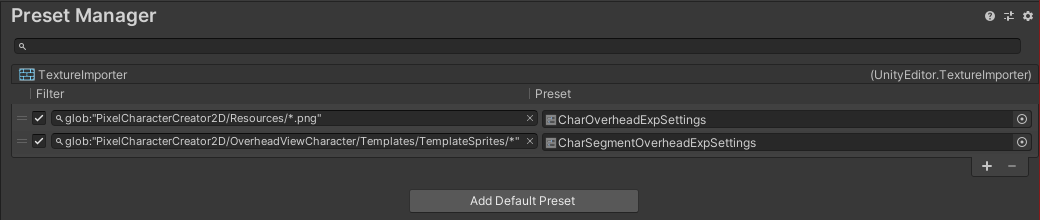
Your Preset Manager Window should now match the example below. We’re now done with the Preset Manager.
1.3
Opening the Character Creator
Before we complete the final step for the setup, I recommend that we take a first look at the Character Creator itself. For now, I want you to learn how to open the Character Creator, and what the individual character editing windows are. Later in the documentation, we’ll go more in-depth.
Step 1.
In the Project tab: navigate to Assets / PixelCharacterCreator2D / OverheadCharacter. In this folder, you will find 3 additional folders, some of which I will explain in greater detail later. For now only the scriptable object “PixelCharacterCreator2D” matters. That is a Scriptable Object that functions as a Character Data Manager. Think of this Data Manager as the main place where all data regarding the characters is gathered. Click on the Scriptable Object once to view it in the inspector.
Step 2.
If you imported the demo files, your inspector window will look similar to the one in the screenshot below. Everything in this Character Data Manager will be explained a bit later, but feel free to quickly look around in the inspector. For now, we need to press the button at the bottom of the inspector called “Open Pixel Character Creator 2D”. Double-clicking the Scriptable Object itself will also open up the Creator Tool.

Info 
Upon opening the Creator, you will see a menu with buttons on the left, an error message bar at the top, and a bigger section with more information on the right. I will quickly mention the different creator windows and what their purposes are in the collapsible sections below:
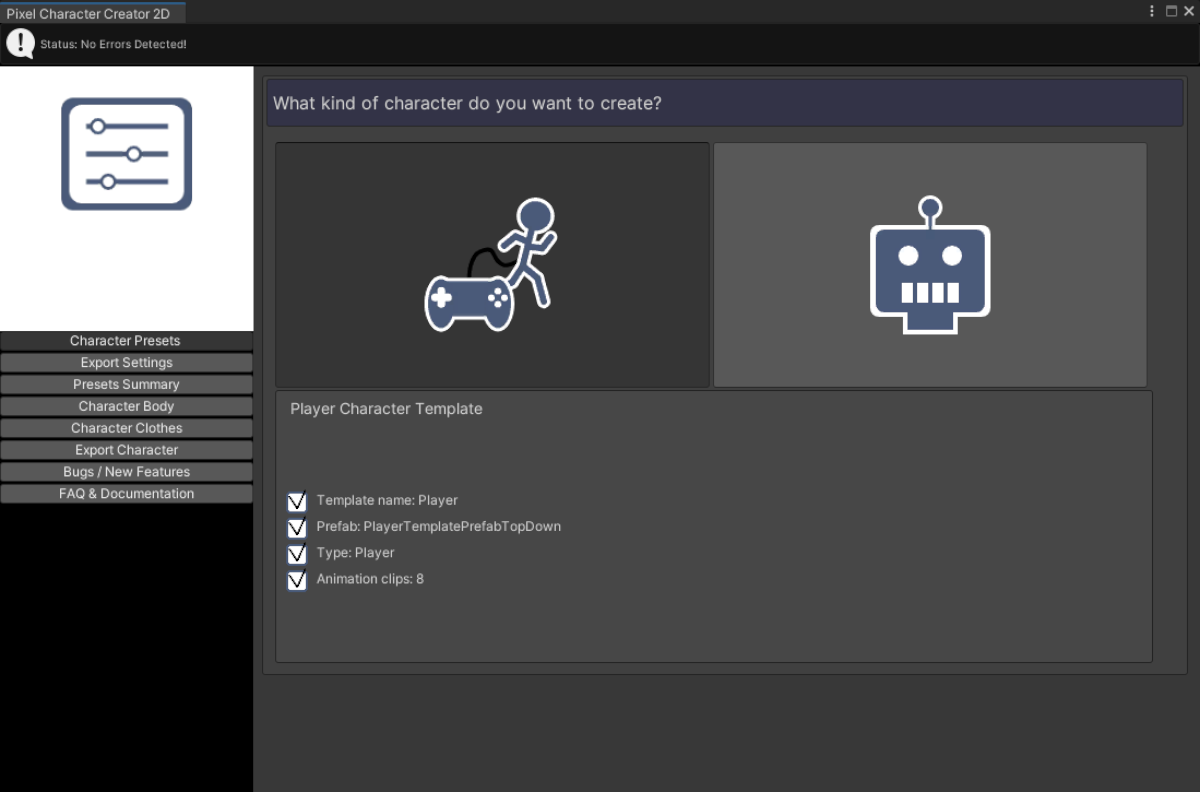
Character Presets
Here you can select if you want to create a Player character or an NPC. You can also preview a bit of information about the Player or NPC which is drawn from a Character Template. More on that in a later chapter.
Export Settings
There are three main exportable parts; the sprite sheet, the prefab, and the animations. Here you can customize the character export process for all three parts. This is where we’ll spend most of our setup time. If you’ve imported the demo, this window will be preset with different values and variables, most of which will be covered in Chapter 1.4.
Presets Summary
As the name implies, this is a summary of your chosen settings. This is also where you get to name the character and initiate the creation process.
Character Body
Upon pressing the ‘Create’ button, this window becomes available. Here you get to edit as little or as many body segments and colors as you want. More on this in Chapter 3.
Character Clothes
Upon pressing the ‘Create’ button, this window becomes available. Here you can edit as little or as many clothing designs and colors as you want. More on this in Chapter 3 as well.
Export Character
If you’re satisfied with your design choices, you can export your character here. This window will also remind you where your designs will be exported to.
Bugs / New Features
In case you find a bug or opportunity for a new feature, you can use this window to send in your feature request or bug report.
FAQ & Documentation
This window will direct you to the FAQ and documentation on this website.
1.4
The Export Settings explained
The Export Settings window displays all settings regarding the output of the Character Creator. Understanding the significance of these settings will help you reach the full potential of this asset.
This section will be divided into three parts:
- Sprite Sheet Export Settings
- Prefab Export Settings
- Animation Export Settings
Sprite Sheet Export Settings
The Sprite Sheet Export Settings section contains variables that control the way sprite sheets are handled. Here you can find variables to alter character preview sprites as well as the actual sprite sheet export at the end of the creation process.
The table below showcases all the variables that have to do with the character sprite preview and the export sprite sheets. These variables can be adjusted to tailor the sprite output to your liking. Review the table below if you find yourself wondering what the variables do.
The Sprite Sheet Export Settings section contains variables that control the way sprite sheets are handled. Here you can find variables to alter character preview sprites as well as the actual sprite sheet export at the end of the creation process.
The table below showcases all the variables that have to do with the character sprite preview and the export sprite sheets. These variables can be adjusted to tailor the sprite output to your liking. Review the table below if you find yourself wondering what the variables do. You can also watch this video here to get a visual explanation of the Sprite Sheet Export section and the variables it contains.
Sprite Sheet Export Variables
Variable Name |
Type |
Variable Usage |
| Sprite Layout In Sheet | Vector2 | The X-value represents the amount of sprites in a horizontal row. In the demo, the sprite sheets have 3 sprites in a horizontal line. The Y-value represents the amount of sprites in a vertical column. In the demo, the sprite sheets have 4 sprites in a vertical line. |
| Export Sprite Sheet Size | Vector2 | The X-value represents the width of the sprite sheet in pixels. In the demo, the width of the sprite sheets is 60 pixels. The Y-value represents the height of the sprite sheet in pixels. In the demo, the height of the sprite sheets is 128 pixels. If the size in this field doesn’t match the actual sprite sheet size in the database, an error message will pop up. |
| Size Per Sprite | Vector2 | The size per sprite is automatically calculated based on the Sprite Layout In Sheet and the Export Sprite Sheet Size. This is calculated as follows: sizePerSprite.x = exportSpriteSheetSize.x / spriteLayoutInSheet.x sizePerSprite.y = exportSpriteSheetSize.y / spriteLayoutInSheet.y |
| Use Power of Two (POT) Sizes | Bool | If this boolean is enabled, the Export Sprite Sheet Size will be converted to the nearest POT (Power Of Two)-size. This is useful if you want to create sprite sheets that are optimized for compression. |
| Export Sprite Sheet POT Size | Vector2 | This is the calculated nearest POT-size of the Export Sprite Sheet Size. If the bool in the row above is enabled, this sheet size will be used instead of the Export Sprite Sheet Size. If the size in this field doesn’t match the actual sprite sheet size in the database, an error message will pop up. |
| Default Preview Sprite | Sprite | A sprite that will show up as a default character design before any adjustments are made to the body or clothes. This sprite will immediately be replaced when updating the character in the Character Creator Window. |
| Chosen Sprite For Multi-sheet Preview | Int | This number determines which sprite (pose) in the sprite sheet will be used to preview the changes you make to the character. In the demo, the default value here is 1, which will show the idle front sprite of the character. Should you, for example, change this number to a 10, the sprite (pose) will change to the idle back sprite of the character. This feature is particularly useful if you want to view the character from different poses during the designing process. |
| Preview Sprite Pivot | Vector2 | If your character sprite has a custom pivot point, this is where you can ensure that the preview sprite has the same pivot point. This is mostly meant to help avoid the sprite’s position suddenly changing during the creation process. |
| Sprite Sheet Offset | Vector2 | If the 1st sprite in your sprite sheet has an offset and doesn’t immediately appear in the top-left corner of your sprite sheet you can use this. The X-value represents the amount of horizontal pixels that need to be bridged before the first sprite in the sheet appears. The Y-value represents the amount of vertical pixels that need to be bridged before the first sprite in the sheet appears. |
| Preview Sprite Pixels per Unit | Int | The Pixels per Unit amount to set the newly created sprite preview at. Make sure this matches the Pixels per Unit of your character segment sprites in the database to avoid unwanted behavior. |
| Transparent Colors | List | This List consists of custom serialized class instances. In code, it looks like this: List<TransparantColor>. The TransparentColor class consists of a string, Color, and two float fields. In this List, you can include default colors with an opacity below alpha 1. This is particularly useful for transparent shadows and see-through clothing pieces such as glasses. |
| Add Numeric Directory for Sprite Sheets | Bool | If this boolean is enabled, an additional numeric directory will be added at the end of the export path. Consider using this option if you prefer to give each character their own directory. |
| Add Numeric Naming for Sprite Sheets | Bool | If this boolean is enabled, a number will be added at the start of the character’s name. Consider using this option if you prefer to have multiple characters in one directory. |
| Player Sprite Sheet Export Path | String | This export path determines where the exported character sheet will be stored after the creation of the character. If this string field is left empty, the character sprite sheet will be placed in the root Assets folder. |
| Temporary Resources Storage Folder | String | If this string isn’t empty, A temporary subfolder will be created in the Resources folder to store the player sprite sheet. That new subfolder will use this string as its name. This is useful for keeping the permanent files you have stored in the Resources folder separate from files created by this asset. |
Sprite Sheet Export Variables
Variable Name & Type |
Variable Usage |
| Sprite Layout In Sheet (Vector2) | The X-value represents the amount of sprites in a horizontal row. In the demo, the sprite sheets have 3 sprites in a horizontal line. The Y-value represents the amount of sprites in a vertical column. In the demo, the sprite sheets have 4 sprites in a vertical line. |
| Export Sprite Sheet Size (Vector2) | The X-value represents the width of the sprite sheet in pixels. In the demo, the width of the sprite sheets is 60 pixels. The Y-value represents the height of the sprite sheet in pixels. In the demo, the height of the sprite sheets is 128 pixels. If the size in this field doesn’t match the actual sprite sheet size in the database, an error message will pop up. |
| Size Per Sprite (Vector2) | The size per sprite is automatically calculated based on the Sprite Layout In Sheet and the Export Sprite Sheet Size. This is calculated as follows: sizePerSprite.x = exportSpriteSheetSize.x / spriteLayoutInSheet.x sizePerSprite.y = exportSpriteSheetSize.y / spriteLayoutInSheet.y |
| Use Power of Two (POT) Sizes (Bool) | If this boolean is enabled, the Export Sprite Sheet Size will be converted to the nearest POT (Power Of Two)-size. This is useful if you want to create sprite sheets that are optimized for compression. |
| Export Sprite Sheet POT Size (Vector2) | This is the calculated nearest POT-size of the Export Sprite Sheet Size. If the bool in the row above is enabled, this sheet size will be used instead of the Export Sprite Sheet Size. If the size in this field doesn’t match the actual sprite sheet size in the database, an error message will pop up. |
| Default Preview Sprite (Sprite) | A sprite that will show up as a default character design before any adjustments are made to the body or clothes. This sprite will immediately be replaced when updating the character in the Character Creator Window. |
| Chosen Sprite For Multi-sheet Preview (Int) | This number determines which sprite (pose) in the sprite sheet will be used to preview the changes you make to the character. In the demo, the default value here is 1, which will show the idle front sprite of the character. Should you, for example, change this number to a 10, the sprite (pose) will change to the idle back sprite of the character. This feature is particularly useful if you want to view the character from different poses during the designing process. |
| Preview Sprite Pivot (Vector2) | If your character sprite has a custom pivot point, this is where you can ensure that the preview sprite has the same pivot point. This is mostly meant to help avoid the sprite’s position suddenly changing during the creation process. |
| Sprite Sheet Offset (Vector2) | If the 1st sprite in your sprite sheet has an offset and doesn’t immediately appear in the top-left corner of your sprite sheet you can use this. The X-value represents the amount of horizontal pixels that need to be bridged before the first sprite in the sheet appears. The Y-value represents the amount of vertical pixels that need to be bridged before the first sprite in the sheet appears. |
| Preview Sprite Pixels per Unit (Int) | The Pixels per Unit amount to set the newly created sprite preview at. Make sure this matches the Pixels per Unit of your character segment sprites in the database to avoid unwanted behavior. |
| Transparent Colors (List) | This List consists of custom serialized class instances. In code, it looks like this: List<TransparantColor>. The TransparentColor class consists of a string, Color, and two float fields. In this List, you can include default colors with an opacity below alpha 1. This is particularly useful for transparent shadows and see-through clothing pieces such as glasses. |
| Add Numeric Directory for Sprite Sheets (Bool) | If this boolean is enabled, an additional numeric directory will be added at the end of the export path. Consider using this option if you prefer to give each character their own directory. |
| Add Numeric Naming for Sprite Sheets (Bool) | If this boolean is enabled, a number will be added at the start of the character’s name. Consider using this option if you prefer to have multiple characters in one directory. |
| Player Sprite Sheet Export Path (String) | This export path determines where the exported character sheet will be stored after the creation of the character. If this string field is left empty, the character sprite sheet will be placed in the root Assets folder. |
| Temporary Resources Storage Folder (String) | If this string isn’t empty, A temporary subfolder will be created in the Resources folder to store the player sprite sheet. That new subfolder will use this string as its name. This is useful for keeping the permanent files you have stored in the Resources folder separate from files created by this asset. |

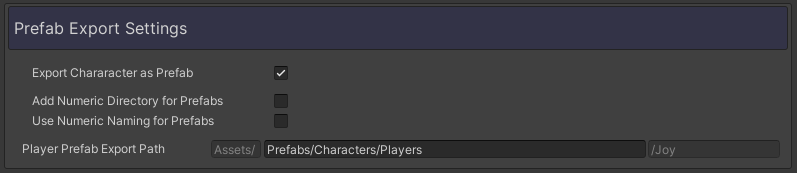
Prefab Export Settings
This is the shortest section of the Export Settings window. The Prefab Export Settings section contains variables that control the way Prefabs are handled. These variables are mostly meant to alter the export path.
Prefab Export Variables
Variable Name |
Type |
Variable Usage |
| Export Character as Prefab | Bool | If this boolean is enabled, a Prefab will be exported at the end of the creation process. Otherwise, this step will be skipped. |
| Add Numeric Directory for Prefabs | Bool | If this boolean is enabled, an additional numeric directory will be added at the end of the export path. Consider using this option if you prefer to give each character their own directory. |
| Add Numeric Naming for Prefabs | Bool | If this boolean is enabled, a number will be added at the start of the character’s name. Consider using this option if you prefer to have multiple characters in one directory. |
| Prefab Export Path | String | This export path determines where the exported Prefab will be stored after the creation of the character. If this string field is left empty, the Prefab will be placed in the root Assets folder. |
Prefab Export Variables
Variable Name & Type |
Variable Usage |
| Export Character as Prefab (Bool) | If this boolean is enabled, a Prefab will be exported at the end of the creation process. Otherwise, this step will be skipped. |
| Add Numeric Directory for Prefabs (Bool) | If this boolean is enabled, an additional numeric directory will be added at the end of the export path. Consider using this option if you prefer to give each character their own directory. |
| Add Numeric Naming for Prefabs (Bool) | If this boolean is enabled, a number will be added at the start of the character’s name. Consider using this option if you prefer to have multiple characters in one directory. |
| Prefab Export Path (String) | This export path determines where the exported Prefab will be stored after the creation of the character. If this string field is left empty, the Prefab will be placed in the root Assets folder. |

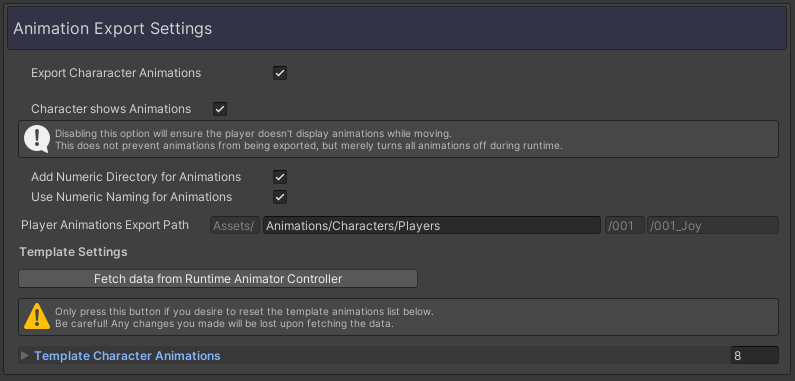
Animation Export Settings
The Animation Export Settings section contains variables that control the way Animations are handled. In addition to the variables that are mostly meant to alter the export path, there are also Template Character Animation variables that can be adjusted.
Animation Export Variables
Variable Name |
Type |
Variable Usage |
| Export Character Animations | Bool | If this boolean is enabled, an Animator Controller and Animations will be exported at the end of the creation process. Otherwise, this step will be skipped. |
| Character Shows Animations | Bool | If this boolean is disabled, the character won’t be animated while performing actions such as walking. This does not prevent the Animations and Animator Controller from being exported but merely turns all animations off during runtime. (This can be changed retroactively if a prefab was also exported.) |
| Add Numeric Directory for Animations | Bool | If this boolean is enabled, an additional numeric directory will be added at the end of the export path. Consider using this option if you prefer to give each character their own directory. |
| Add Numeric Naming for Animations | Bool | If this boolean is enabled, a number will be added at the start of the character’s name. Consider using this option if you prefer to have multiple characters in one directory. |
| Player Animations Export Path | String | This export path determines where the exported character animations will be stored after the creation of the character. If this string field is left empty, the character animations and animator controller will be placed in the root Assets folder. |
| Template Character Animations | List | This List consists of custom serialized class instances. In code, it looks like this: List<TemplateCharacterAnimation>. The TemplateCharacterAnimation class consists of many fields that manipulate how animations function. The List is automatically filled with Template Animation Data from the Template Character’s Runtime Animator Controller. In this List, you can change variables such as the keyframe amount, loop time, and frames per second. |
Animation Export Variables
Template Character Animations (List)This List consists of custom serialized class instances. In code, it looks like this: List<TemplateCharacterAnimation>. The TemplateCharacterAnimation class consists of many fields that manipulate how animations function. The List is automatically filled with Template Animation Data from the Template Character’s Runtime Animator Controller. In this List, you can change variables such as the keyframe amount, loop time, and frames per second.
Variable Name & Type |
Variable Usage |
| Export Character Animations (Bool) | If this boolean is enabled, an Animator Controller and Animations will be exported at the end of the creation process. Otherwise, this step will be skipped. |
| Character Shows Animations (Bool) | If this boolean is disabled, the character won’t be animated while performing actions such as walking. This does not prevent the Animations and Animator Controller from being exported but merely turns all animations off during runtime. (This can be changed retroactively if a prefab was also exported.) |
| Add Numeric Directory for Animations (Bool) | If this boolean is enabled, an additional numeric directory will be added at the end of the export path. Consider using this option if you prefer to give each character their own directory. |
| Add Numeric Naming for Animations (Bool) | If this boolean is enabled, a number will be added at the start of the character’s name. Consider using this option if you prefer to have multiple characters in one directory. |
| Player Animations Export Path (String) | This export path determines where the exported character animations will be stored after the creation of the character. If this string field is left empty, the character animations and animator controller will be placed in the root Assets folder. |
| Player Animations Export Path (String) | This List consists of custom serialized class instances. The TemplateCharacterAnimation class consists of many fields that manipulate how animations function. In this List, you can change variables such as the keyframe amount, loop time, and frames per second. You can read more about Template Animations in Chapter 4. |