In this chapter, you’ll learn everything you need to know about Character Data Clusters and Databases. In addition to explaining how a Character Data Cluster works, I’m also going to give you step-by-step instructions on how to create your own data clusters and databases. Open the table of contents below to hop to a specific subchapter.
Data Manager part 1: Clusters & Databases
Documentation: Pixel Character Creator 2D
Table of contents

3.1
What is a Character Data Cluster?
The purpose of Character Data Clusters
Character Data Clusters are data bundles that can be found within a Character Data Manager. Data Clusters contain information about a specific character part. For instance, if you want to be able to customize the hair of a character, creating a Data Cluster for the character’s hair will allow you to do so. The general idea is that a Data Cluster should be created for each part of the character that you want to be able to change. This way you can:
- make a very simple character comprised of only a few Data Clusters (I.E. for a body and face).
- make a very detailed character with many different parts that can be changed independently from each other.
There are no limits regarding how many Data Clusters can be used for the creation of a character. The addition of a Data Cluster will give you more control at the cost of a bit more setup time. I recommend thinking the designs of your characters through a bit. How many parts of the character would you want to be able to change independently from another? If you find yourself wanting to change the ‘hair’, ‘eyes’, ‘mouth’, and ‘skin’ then the amount of Data Clusters will most likely be four.
The variables in a Data Clusters
In the collapsable section below, you can view the different variables that allow you to define certain aspects of the Character Data Cluster. This Data Cluster is then read by the Pixel Character Creator 2D and taken into account during the creation process of the character.
Character Data Cluster Variables
Variable Name |
Type |
Variable Usage |
| Label | String | The name of the Character Data Cluster. This name will be shown as the label inside of the Character Creator 2D editor. |
| Display Window | Enum | This enum decides whether this Data Cluster will be shown in the ‘body’ section of the Character Creator or the ‘clothing’ section. |
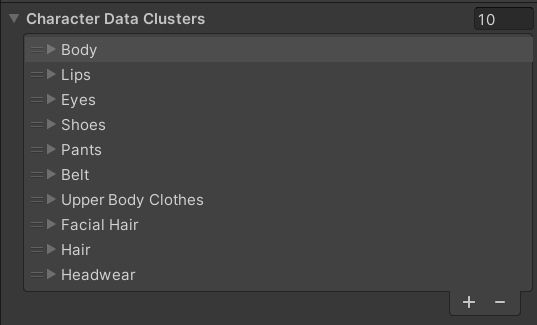
| ID | Int | The ID of this Character Data Cluster. This ID is used for recognition purposes by other clusters or other scripts. Typically, you’d want to keep the ID variable the same as the Character Data Clusters index number. |
| Can Be Disabled | Bool | If this boolean is enabled, a tick box will appear next to the label of this cluster, inside the Character Creator. This way you can make certain character parts, such as hair, entirely optional. |
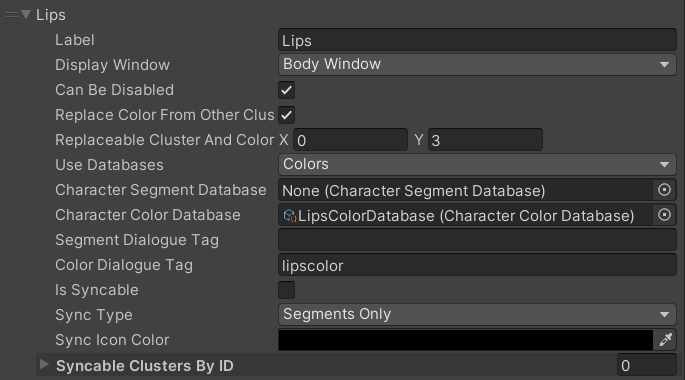
| Replace Color From Other Cluster | Bool | This allows you to look inside another cluster for a specific color to replace with the chosen color from this cluster. You’ll typically only use this option if you have a Data Cluster that’s only in charge of replacing a specific color, without adding a new sprite. In the demo, this option is used to replace the color of the character’s lips with a different color, without changing the sprite of the character’s face. |
| Replaceable Cluster And Color | Vector2 | This variable only works if the boolean “Replace Color From Other Cluster” is set to true. The X-variable represents the cluster you want to replace a specific color from. The Y-variable represents the specific color inside of the cluster you want to replace. In the demo, this value is set to Vector2(0,3). This means that the 3rd color (#EBC1A8) inside of cluster 0 (Body) will be replaced by the chosen lip color. |
| Use Databases | Enum | This enum decides whether this Data Cluster will make use of Character Segments (sprites), Character Color Groups, or both. This can be handy if you want to create a cluster that’s only meant to add a sprite or color instead of both. |
| Character Segment Database | Scriptable Object | The Segment Database for this specific Data Cluster should be placed here. Segment Databases contain data for a specific sprite sheet that belongs to this cluster. If this cluster is supposed to be meant for the character’s hair, the Segment Database should contain all the different hairstyles that the character can wear. |
| Character Color Database | Scriptable Object | The Color Database for this specific Data Cluster should be placed here. Color Databases contain data for the colors that belong to this cluster. If this cluster is supposed to be meant for the character’s hair, the Color Database should contain all the different hair color options. |
| Segment Dialogue Tag | String | This tag will allow for the segment in this Data Cluster to be recognizable in dialogue. This only works when combined with the Basic Dialogue System. In this field, you should add the tag with which you want to refer to this cluster’s segment (sprite). For the hairstyle of the character, this could be hairstyle. |
| Color Dialogue Tag | String | This tag will allow for the colors in this Data Cluster to be recognizable in dialogue. This only works in conjunction with the Basic Dialogue System. In this field, you should add the tag with which you want to refer to this cluster’s colors. For the hairstyle of the character, this could be haircolor. |
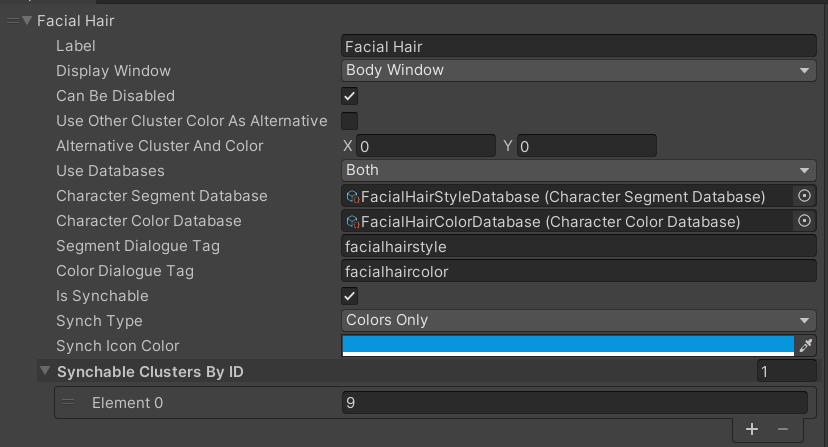
| Is Syncable | Bool | If this boolean is set to true, this Data Cluster can be synced to another Data Cluster. This can be useful if you have matching sprites or matching colors that you want to always equip simultaneously. In the demo, for example, the character can have facial hair and hair on their head. If both of these options are enabled and you try to change the hair color of either cluster, both clusters end up with the same color. This ensures you won’t have to manually set the hair and facial hair colors separately, which might save some time during the creation process. |
| Sync Type | Enum | If the boolean “Is Syncable” is enabled, this enum allows you to determine if segments (sprites), colors, or both should be synced with another Data Cluster. This can allow for scenarios where, for example, hairstyles (on head and face) don’t have to be synced, but hair colors do. |
| Sync Icon Color | Color | This field determines the color of the Sync Icon in the Creator Window. This only serves an aesthetic purpose. The reason why you’d want to change this color is to keep your synced clusters organized if you have multiple Data Clusters that are synced to one another. |
| Syncable Clusters By ID | List<int> | This list can be used to define which specific Data Clusters should be synced to this one. In the demo, the ‘Facial Hair’ cluster with ID 7 links to ID 8 in this field. This means that cluster 8 will be changed if cluster 7 changes. If you link back from cluster 8 to cluster 7 as well, both clusters are in control of the other cluster. |
Character Data Cluster Variables
Variable Name |
Variable Usage |
| Label (String) | The name of the Character Data Cluster. This name will be shown as the label inside of the Character Creator 2D editor. |
| Display Window (Enum) | This enum decides whether this Data Cluster will be shown in the ‘body’ section of the Character Creator or the ‘clothing’ section. |
| ID (Int) | The ID of this Character Data Cluster. This ID is used for recognition purposes by other clusters or other scripts. Typically, you’d want to keep the ID variable the same as the Character Data Clusters index number. |
| Can Be Disabled (Bool) | If this boolean is enabled, a tick box will appear next to the label of this cluster, inside the Character Creator. This way you can make certain character parts, such as hair, entirely optional. |
| Replace Color From Other Cluster (Bool) | This allows you to look inside another cluster for a specific color to replace with the chosen color from this cluster. You’ll typically only use this option if you have a Data Cluster that’s only in charge of replacing a specific color, without adding a new sprite. In the demo, this option is used to replace the color of the character’s lips with a different color, without changing the sprite of the character’s face. |
| Replaceable Cluster And Color (Vector2) | This variable only works if the boolean “Replace Color From Other Cluster” is set to true. The X-variable represents the cluster you want to replace a specific color from. The Y-variable represents the specific color inside of the cluster you want to replace. In the demo, this value is set to Vector2(0,3). This means that the 3rd color (#EBC1A8) inside of cluster 0 (Body) will be replaced by the chosen lip color. |
| Use Databases (Enum) | This enum decides whether this Data Cluster will make use of Character Segments (sprites), Character Color Groups, or both. This can be handy if you want to create a cluster that’s only meant to add a sprite or color instead of both. |
| Character Segment Database (Scriptable Object) | The Segment Database for this specific Data Cluster should be placed here. Segment Databases contain data for a specific sprite sheet that belongs to this cluster. If this cluster is supposed to be meant for the character’s hair, the Segment Database should contain all the different hairstyles that the character can wear. |
| Character Color Database (Scriptable Object) | The Color Database for this specific Data Cluster should be placed here. Color Databases contain data for the colors that belong to this cluster. If this cluster is supposed to be meant for the character’s hair, the Color Database should contain all the different hair color options. |
| Segment Dialogue Tag (String) | This tag will allow for the segment in this Data Cluster to be recognizable in dialogue. This only works when combined with the Basic Dialogue System. In this field, you should add the tag with which you want to refer to this cluster’s segment (sprite). For the hairstyle of the character, this could be hairstyle. |
| Color Dialogue Tag (String) | This tag will allow for the colors in this Data Cluster to be recognizable in dialogue. This only works in conjunction with the Basic Dialogue System. In this field, you should add the tag with which you want to refer to this cluster’s colors. For the hairstyle of the character, this could be haircolor. |
| Is Syncable (Bool) | If this boolean is set to true, this Data Cluster can be synced to another Data Cluster. This can be useful if you have matching sprites or matching colors that you want to always equip simultaneously. In the demo, for example, the character can have facial hair and hair on their head. If both of these options are enabled and you try to change the hair color of either cluster, both clusters end up with the same color. This ensures you won’t have to manually set the hair and facial hair colors separately, which might save some time during the creation process. |
| Sync Type (Enum) | If the boolean “Is Syncable” is enabled, this enum allows you to determine if segments (sprites), colors, or both should be synced with another Data Cluster. This can allow for scenarios where, for example, hairstyles (on head and face) don’t have to be synced, but hair colors do. |
| Sync Icon Color (Color) | This field determines the color of the Sync Icon in the Creator Window. This only serves an aesthetic purpose. The reason why you’d want to change this color is to keep your synced clusters organized if you have multiple Data Clusters that are synced to one another. |
| Syncable Clusters By ID (List<int>) | This list can be used to define which specific Data Clusters should be synced to this one. In the demo, the ‘Facial Hair’ cluster with ID 7 links to ID 8 in this field. This means that cluster 8 will be changed if cluster 7 changes. If you link back from cluster 8 to cluster 7 as well, both clusters are in control of the other cluster. |
3.2
Adding a custom Data Cluster
Whether you are starting with an empty Character Data Manager or adding additional Character Data Clusters to an existing Character Data Manager, making your own custom Data Clusters appear in the Character Creator can greatly enhance your experience with this asset. In this section, I’ll go over adding a new Data Cluster to the pre-existing clusters you’re given with the download of the asset. If you wish to learn how to set the Character Creator up from scratch I have a separate documentation page that goes in detail about that particular topic.
Step 1.
Open the Scriptable Object called “PixelCharacterCreator2D” in the inspector. This will give you an overview of all the Character Data Clusters at the top.
Step 2.
Click on the ![]() icon to add a new Character Data Cluster. This will create an exact copy of the Data Cluster on the bottom. Let’s change the Label variable of the new Data Cluster to “Gloves”.
icon to add a new Character Data Cluster. This will create an exact copy of the Data Cluster on the bottom. Let’s change the Label variable of the new Data Cluster to “Gloves”.
Step 3.
Let’s keep most of the variables the same as the “Headwear” data cluster. I’ll note the other variables that I want you to change below:
- Remove the Scriptable Objects in the “Character Segment Database” and “Character Color Database” sections. We’ll add new databases in a bit.
- If you so choose you can add a dialogue tag for the new Data Cluster for both the segment and color. This doesn’t impact the process of the Character Creator itself, so in this tutorial, I will keep these string fields empty.
Step 4.
Now open the Character Creator by clicking on the button “Open Pixel Character Creator 2D” or double-clicking on the Scriptable Object itself. Upon opening the Creator Tool, you will be greeted with a red text at the top of the window: “Status Database(s) not found!“. This message is meant as a reminder that the Character Creator won’t function properly because we just added a new Data Cluster without any databases attached. For now, we can choose to ignore this message and try to create a character nonetheless. Click on the “Presets Summary” tab on the left, choose a name for your character, and press “Create new Character”.
Step 5.
If we go to the “Character Clothes” tab, you should be able to see a new section with a tick box next to it called “Character has Gloves”. You can enable and disable this option but we aren’t able to select any gear. We now only see two messages in red:
“Gloves doesn’t have a Segment Database attached”
“Gloves doesn’t have a Color Database attached”
These messages will go away if we add databases to our new Data Cluster. Let’s start by adding a Segment Database. You can read about that in section 3.3.
3.3
Creating a Segment Database
A Segment Database contains Character Segments which the user can populate the Character Creator with. A Character Segment is a custom class that consists of a string field (the name of the segment) and a Sprite field (for the sprite sheet associated with this Character Segment). In this section you are going to read about creating a Segment Database, adding a segment to the database, and lastly, connecting this new Segment Database to the Character Data Manager.
Step 1.
The first thing to do is decide where you want to store your new Segment Database. For this tutorial, I recommend placing this new database in the same location where the other Segment Databases are kept. Here is the path to finding them:
Assets / PixelCharacterCreator2D / OverheadCharacter / Databases / SegmentDatabases
Once in this folder, click the right mouse button and choose:
Create > Database > Character > Segment Database
I will name it GlovesStyleDatabase to stay consistent with the rest of the database names, but you can name the database whatever you like.
Step 2.
Upon inspecting the new Scriptable Object you just created you will see that it doesn’t contain any “segments”. If you add a segment to the list your view will match the image below. Now we have to add a name and a sprite sheet to this segment.
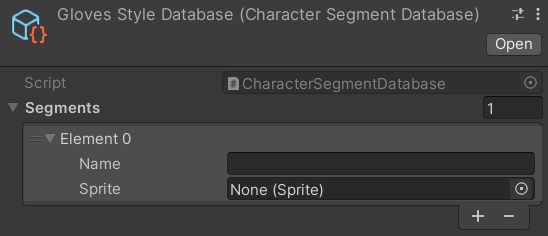
- For simplicity’s sake, I will name this segment “Default Glove“.
- For the sprite, we’ll want to add a new sprite sheet that shows the design of this segment in all of the angles in which the character can stand and walk. I have prepared a sprite sheet for this tutorial. Feel free to download this sprite sheet so you can use it to follow along. You can download it by clicking the button below.
Step 3.
With the sprite sheet downloaded, add it to the Unity Project and place it in a folder that makes sense to you. I recommend placing it near the other Character Segment Sprite Sheets. You can find those at the following directory path:
Assets / PixelCharacterCreator2D / OverheadCharacter / Templates / TemplateSprites
Step 4.
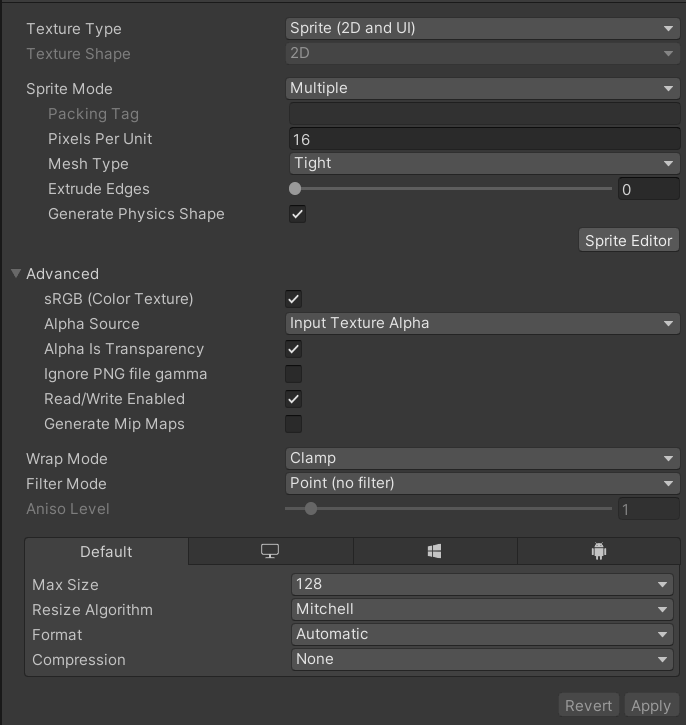
Before we continue, let’s check if the Texture Import Settings match the settings that we need. Click on the sprite sheet you just added to the project. If your export settings aren’t automatically set to the settings in the example screenshot above Step 5, you can fix the settings quite easily by doing the following:
- Click on the
 icon in the top-right corner (above the “Open” button).
 - Select CharSegmentOverheadExpSettings.
- Click Apply in the bottom right of the Import Settings windows.
Your Texture Import Settings should now be good to go.
Step 5.
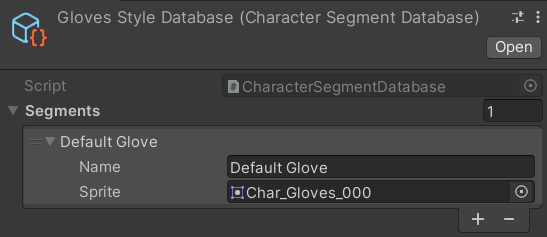
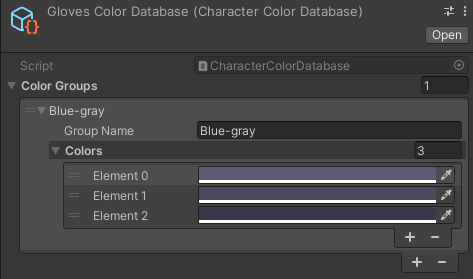
Drag the sprite sheet you added to the project into the empty sprite field of the Default Glove. If you’ve followed along entirely thus far, your GlovesStyleDatabase should now match the one below. You’ve now successfully created an equipable glove. Now all we have to do is ensure we can see this glove inside of the Character Creator.
Step 6.
Return to the PixelCharacterCreator2D Scriptable Object and go to the Gloves Data Cluster we created. We now have to add our newly created GlovesStyleDatabase into the open slot called “Character Segment Database”. You can add it by dragging the database into the field or by clicking on the white dot ![]() next to the empty field and selecting the GlovesStyleDatabase there.
next to the empty field and selecting the GlovesStyleDatabase there.
You have now successfully added a Segment Database to the new Character Data Cluster. If you open the Character Creator window, you will see that there is still an error. However, if we try to create a character as we’ve tried before, we can now see that the Gloves Style was added to the Character Creator. We won’t be able to select other gloves, because we only added a single glove. This means that we’ll always equip the Default Glove if the “Character has Gloves” check box is set to true. If you want to add more gloves to choose from, you can do so by repeating the previous steps 2 through 5.

Now we just have to add a Color Database. We’ll do so in section 3.4.
3.4
Creating a Color Database
A Color Database contains Character Color Groups which the user can populate the Character Creator with. A Color Group is a custom class that consists of a string field (the name of the Color Group) and a List (with an infinite amount of color fields). In this section, you are going to read about creating a Color Database, adding two color groups to the database, and connecting this new Color Database to the Character Data Manager. If you read section 3.3 before this one, you’ll find that a lot of steps are roughly the same. That should help expedite this process a little.
Step 1.
Firstly, you’ll have to pick a folder where you want to store your new Color Database. For this tutorial, I will be placing this new database in the same folder where the other Color Databases are kept. Here is the path to finding them:
Assets / PixelCharacterCreator2D / OverheadCharacter / Databases / ColorDatabases
Once in this folder, click the right mouse button and select:
Create> Database> Character > Color Database
I will name it GlovesColorDatabase, but you can name the database whatever you prefer.
Step 2.
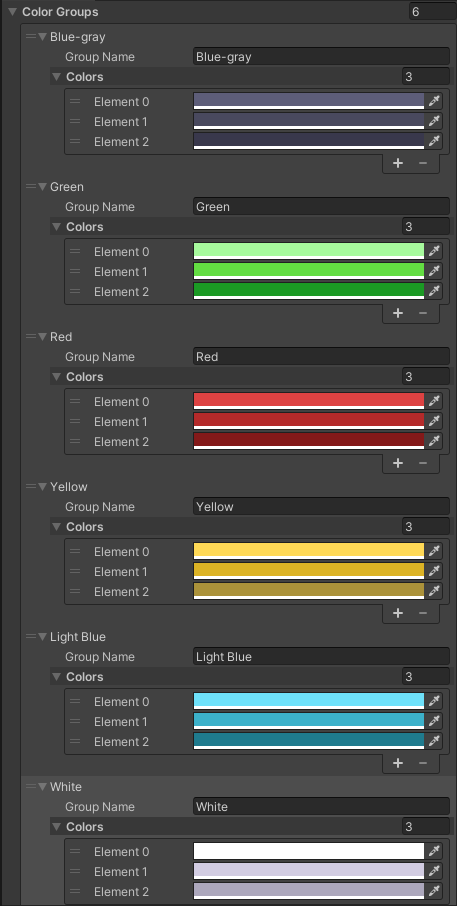
Upon inspecting the new Scriptable Object you’ll notice that it doesn’t contain any Color Groups yet. If you populate the list with a Color Group, your inspector window should match the preview below.
We can now add a name and define the colors for this Color Group:
- I will name this Color Group “Blue-gray“. This will be the default color because the gloves in the sprite sheet were created with this color.
- Now we have to add the hex codes for every color that we used in the gloves sprite sheet. I recommend using a tool to extract all hex codes from an image file to avoid having to find all hex codes yourself. The software of my choice is Aseprite, which you can get for free. If you load in your image in Aseprite you will be able to see every hex code that was used. Now it’s just a matter of copying those hex codes inside of our Color Group. To help move the tutorial further along I saved you the trouble of finding the hex codes of the gloves. You can find them in the three squares below and copy those hex codes into the color fields.
| #5D5D79 | #49495E | #39384C |
With the colors added, your Color Group should now look like the one in the example below.
Step 3.
You may recall me stating that we need to add two Color Groups. That’s because the first Color Group holds all the default colors. Those default colors always have to match the colors of the sprite sheet. For the second Color Group, we are free to add whatever colors we want. You can perform the same steps you made for the first group, but this time either add your own hex codes or borrow a few more hex codes from me. I have put a few hex codes below, just in case you need them. When adding colors, don’t forget to set the alpha to 1.
| #A7FA9D | #63DD42 | #1B9A24 |
| #DD4242 | #B42A2A | #841919 |
| #FFD956 | #DCB325 | #AB923A |
| #6EE1FA | #3CB1CA | #1F7B8E |
| #FBFBFB | #D2CCE2 | #ACA7BC |
Step 4.
After you’ve added a second Color Group, go back to the PixelCharacterCreator2D Scriptable Object. Go to the Gloves Data Cluster and add our new GlovesColorDatabase into the open slot called “Character Color Database”. As a reminder: you can add it by dragging the Color Database into the field or by clicking on the white dot ![]() next to the empty field and selecting the GlovesColorDatabase.
next to the empty field and selecting the GlovesColorDatabase.
You have successfully added a Color Database to the Gloves Character Data Cluster. If you open the Character Creator window now you will see that there are no more errors. You can now select both the Gloves Style and Gloves Color in the Character Creator. You’ll notice that you can switch between the default color and the other color(s) you added. The more Color Groups you add to the Color Database, the more choices you’ll have in this window.
The process in this subchapter is scheduled for an update. As soon as a new version of the Pixel Character Creator 2D launches on the Unity Asset Store, this page will be updated with the changes in the patched version.
3.5
Syncable Data Clusters
In the foldable variables section in Chapter 3.1, I briefly discussed that Character Data Clusters can be synced. Syncing Data Clusters will ensure that certain Character Segments and/or Colors will always match accordingly. An example of this could be the color of hair on a character’s head and facial hair color.

How to sync up two or more Data Clusters?
Step 1.
Determine which Data Clusters should be synced. Additionally, consider whether you want both the segments and colors to sync up or if you just want segments or colors to be synced.
Step 2.
Navigate to Assets / PixelCharacterCreator2D / OverheadCharacter, then select the scriptable object “PixelCharacterCreator2D” and look at it in the inspector. Then navigate to the Data Clusters you want to sync up.
Step 3.
Set the “Sync Type” for both Data Clusters to any of the following options that matches your intention the best:
- Segments Only (if only sprites should be synced. For example, if you have a matching headwear style for every upper clothing option, and if said headwear should always be equipped automatically when selecting upper body clothes.)
- Colors Only (if only colors should be synced. For example, if you want to match hair color with facial hair color.)
- Both (if both sprites and colors should be synced.)
Step 4.
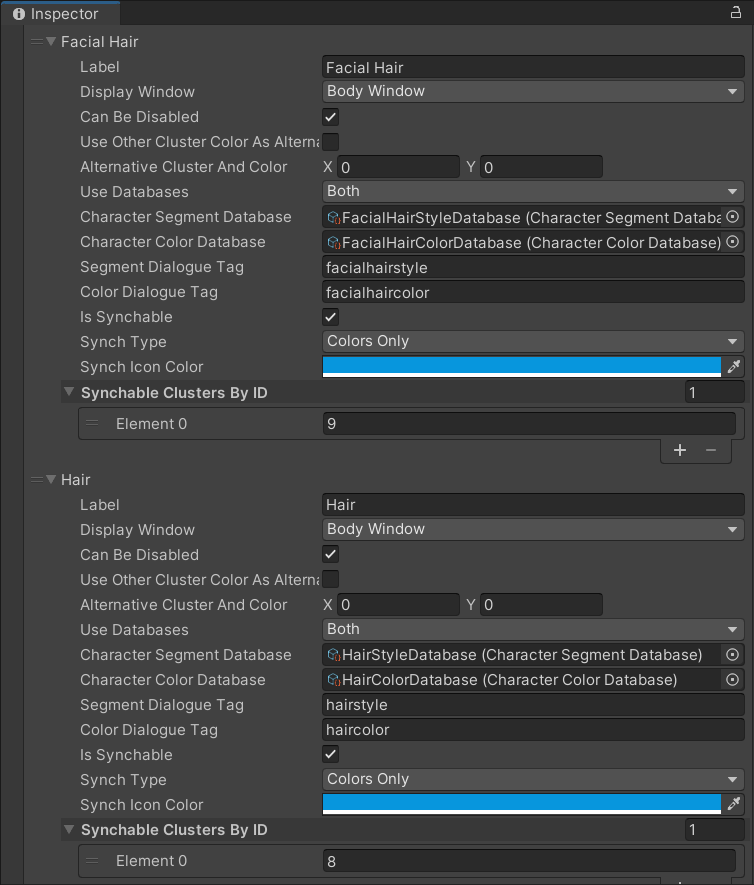
Set the “Sync Icon Color” for both Data Clusters to a color that will help you recognize that these clusters are synced. The Sync Icon looks like this  and will match the color you choose. This way you can set up multiple data clusters that sync with each other. By color coding your Syncable Data Clusters, you will create a far more understandable workflow. View the image below to see what I mean. Don’t forget to also set the Alpha to 1. Otherwise, your colors will be fully opaque.
Step 5.
We now have Data Clusters that are ready to be synced. However, we’re not there yet. To achieve the result in the screenshot below, we have to tell the Data Cluster which other Data Clusters they need to sync up with.
To reproduce the contents of the screenshot we have to add one or more integers to the “Syncable Clusters By ID”. The ID we need to reference is the same as the indexing position in the Character Data Clusters List. For example, the Body Data Cluster has ID 0, because it is at the top of the list. Consequently, the Headwear Data Cluster’s ID is 9 if the list contains 10 Data Clusters in total because it is at the bottom of the list. By counting the index position of the cluster inside of the list, you’ll know what the ID is and what ID you’ll need to refer to. Keep in mind that if you eventually decide to rearrange the order of the Data Clusters, you’ll have to adjust the Syncable Clusters By ID segment as well, as this doesn’t change automatically. Since I’ve added a Gloves Data Cluster to the list, my order has changed, making the Headwear Data Cluster’s ID 10 instead of 9.
3.6
Replacing colors from another cluster
In the collapsible variables section in Chapter 3.1, I briefly noted that it is possible to use a Data Cluster to replace an existing color from another cluster. In this section I’ll give step-by-step instructions to help you achieve this.
The what, the why, and the when for replacing colors from other clusters
Before I show you how to implement this properly, it’s important to know why and when to use this feature. The core reason for this function existing is to add or remove a color at will, without affecting the base design of any of the Character Segments. In the screenshot on the right, I’ll show a Data Cluster that implements this functionality. This is an optional Data Cluster that allows you to add or remove a lip color. It sounds simple enough, but there is more going on. The Data Cluster in this screenshot:
- overwrites one specific color from one specific cluster;
- can be turned off, without the character losing a mouth (as the mouth’s base design is part of the body cluster);
- can overwrite the lip color, no matter the body’s skin tone. This is possible because we’re not looking for a specific hex code, but rather an index number;
- doesn’t have an associated Segment Database, because it will be using a Segment Database from another Data Cluster.
An alternative use case for this feature could be the addition of optional highlights to the character’s hair, by replacing a specific color from the hair. This wouldn’t change the design of the hair itself, but just one specific color from that hair.
Setting this up yourself
Step 1.
Navigate to Assets / PixelCharacterCreator2D / OverheadCharacter, then select the scriptable object “PixelCharacterCreator2D” and look at it in the inspector. Then navigate to the Data Clusters and add a new one with the ![]() icon.
icon.
Step 2.
Determine which color from which Data Cluster you want to replace. In the previous example, we wanted to overwrite the default lip color of the character with an extra lip color. The default lip color for the character can be found inside the Color Database linked to the “Body” data cluster. Since the “Body” Data Cluster is at index 0, this is the X-value in the Vector2 variable “Replaceable Cluster And Color”. Now all that’s left is the Y-value, which is the index number of the color we want to replace. The lip color of the character is the fourth color (index 3) inside of the “Body” Color Database.
In short, this means that if we set “Replaceable Cluster And Color” to Vector2(0,3), we are replacing the fourth color inside the first Character Data Cluster’s Color Database.
Step 3.
Set the following variables:
- set “Can Be Disabled” to true;
- set “Replace Color From Other Cluster” to true;
- now decide which color from which Data Cluster you want to override and set the Vector2 field “Replace Cluster And Color” to that respective value. (if you need help with this I recommend watching this linked video);
- set “Use Databases” to “Colors”;
- ensure the Character Segment Database field is left empty.
- add a Character Color Database for this specific cluster. Inside that database:
- add at least one Color Group.
- add just 1 color per Color Group.
You are free to set the remaining variables to your liking.
Step 4.
You should now be able to select a new color inside of the Creator window. If you update the look of the character, this new color should overwrite the color you selected. As you’ve probably noticed, this is a very situationally useful feature and may be tweaked in the future depending on user feedback.
3.7
Saving your designs for later use
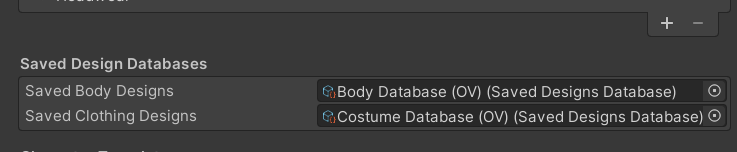
There might come a time when you’d want to have multiple characters wearing the same clothes or having multiple characters of the same race but with different clothes. While it is possible to recreate the clothes and body types over and over again, why not make this a bit easier for yourself? What if you could save a design you created for later and fast-select that design for other characters? Well… you can! The screenshot shows another section within the Character Data Manager. This section is in charge of holding the Saved Body Designs and Saved Clothing Designs for you. Let’s see how it works and how you can easily save and fast-select your designs.
Creating Databases for the Saved Designs
If your Data Manager’s Saved Designs section doesn’t match the screenshot chances are you haven’t set up Saved Design Databases yet. Before we can save our designs we have to create two Saved Design Databases. One for the body section and one for the clothes section. You can do so by selecting Create > Game Between The Lines > Character Creator 2D > Database > Saved Designs Database.
After you’ve created those databases, give them proper names so you know which database holds which types of data. After that, just drag these databases into their corresponding fields in the Character Data Manager. You’re now done with setting up the databases.
Note: if you forget to create these databases and/or drag them into their corresponding fields, you won’t be able to save your designs and select them for new characters. Error messages will pop up in the Console instead.
Mix clothes or choose an existing design
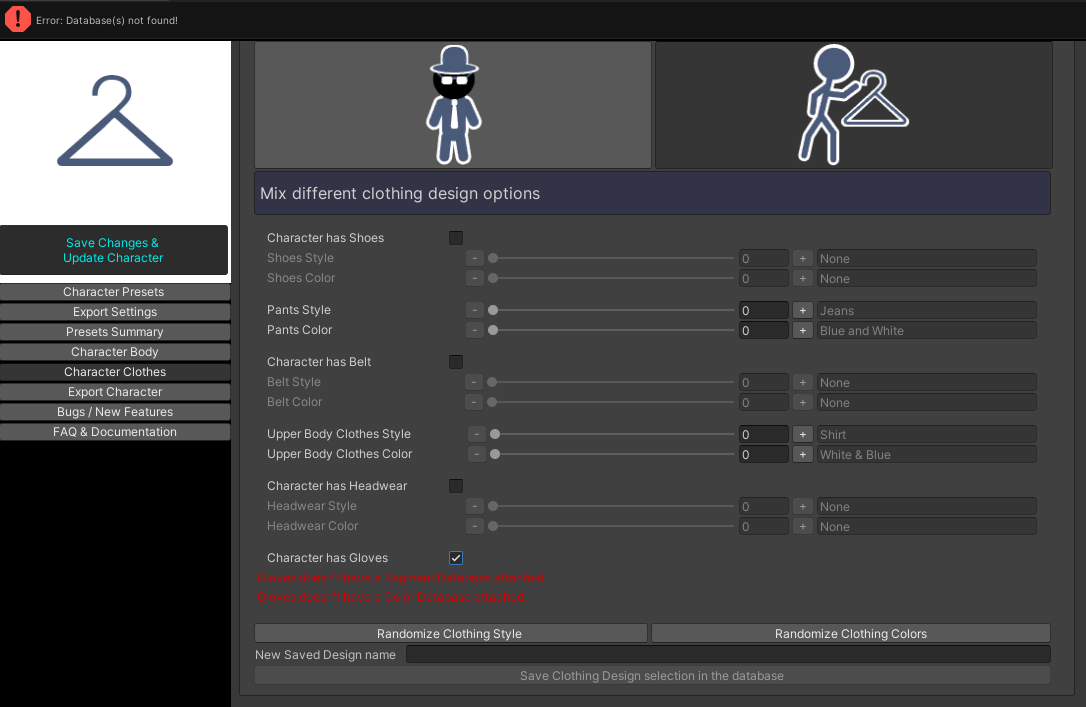
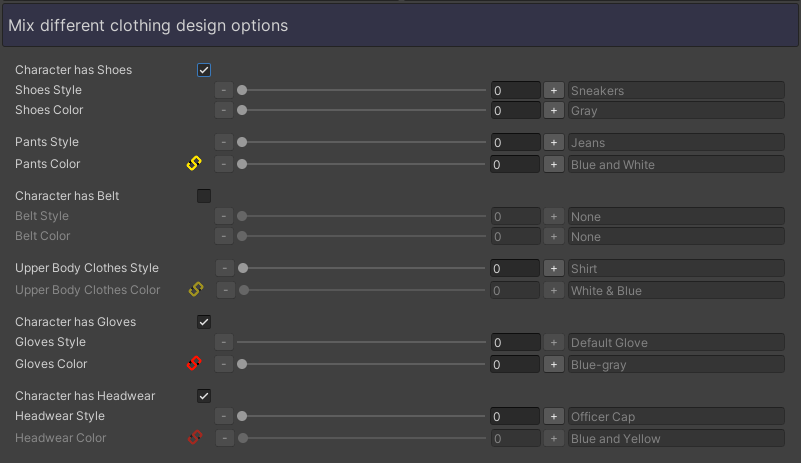
Upon navigating to either the Character Body or Character Clothes window, you will find two buttons at the top of the page, both with an icon. The icon on the right displays a character handpicking their clothes. This is the section for handpicking every little piece of the character’s design. The icon on the left displays a character in a costume. In this section, you can scroll through your saved designs and fast-select any design you’ve previously created.

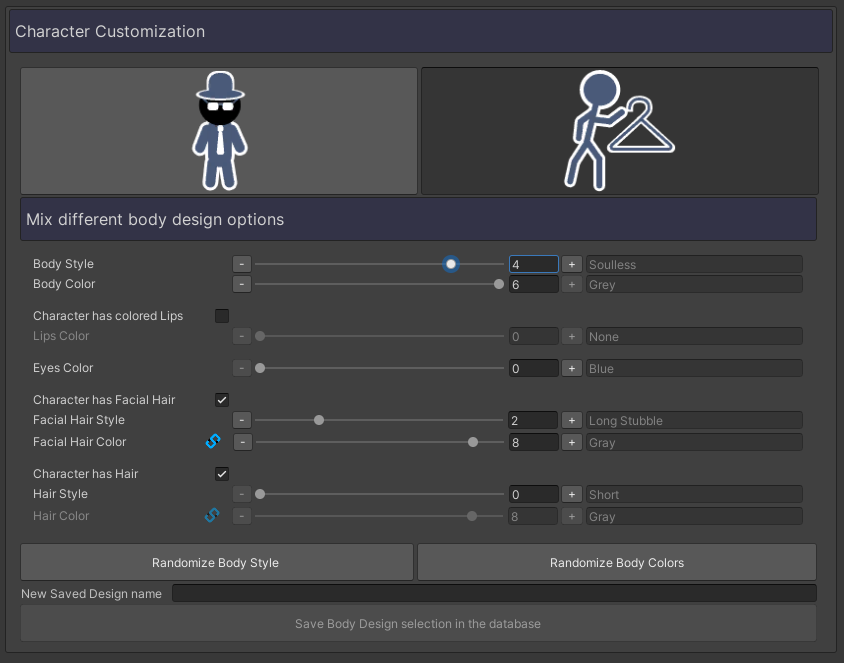
Mix different body/clothing design options
If you are in the section that matches this icon, you’ll be able to hand-pick different body or clothing options. This is also the place where we get to save our designs. We can do so by doing the following:
Step 1.
Select the body or clothing you style you design to save. Be sure to hit the save button as well so you know what the design looks like.
Step 2.
Navigate to the bottom of the window to the greyed-out button that says “Save Body/Clothing Design selection in the database“. We can enable this button by giving our currently equipped body or clothes a name. Fill in the name for the saved design in the “New Saved Design Name” field, then press the button below to save the design. Congratulations, you have just saved your first body/clothing design to a Saved Designs Database.
Note: the button will remain greyed out if no Saved Design Databases have been defined.

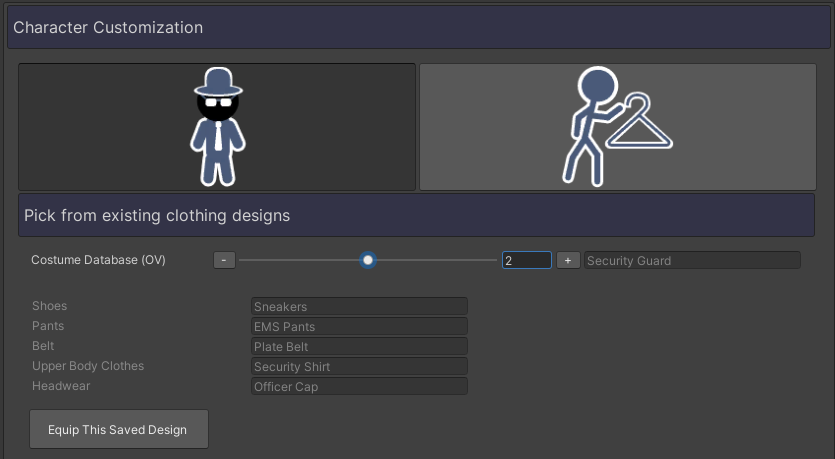
Pick from existing body/clothing designs
Now that we have saved at least one body or clothing design, we should try to equip it with another character. In order to equip your newly saved design, follow the steps below:
Step 1.
If the design you just saved was a Body Design, navigate to the Character Body selection and then click the button that matches this section’s icon. If the design you just saved was a Clothing Design, navigate to the Character Clothes selection and then click the button that matches this section’s icon.
Step 2.
Your view should now resemble the screenshot. Your view will differ depending on the amount of saved designs you have stored in the database. Select the design you want by inputting the index number you want or by dragging the circle on the bar left or right. This will change the text on the right. The greyed-out text will display the name of the saved designs in the database. The name you just saved should (also) be in there. Below you can view all of the specific segments your character has equipped. At the bottom, there is a button called “Equip This Saved Design”. If you click that button, the design you selected will be equipped. Please note that if you don’t see any changes with your character, you need to click the “Saved Changes & Update Character button“.