In this section, we’ll go over the entire setup process when starting a new project with the Pixel Character Creator 2D from scratch. This means we won’t be using any demo files and we won’t be using the default character templates and files that come with the project. Instead, we’ll add different pixel art characters, and color palettes and create every database and data cluster from the ground up. This section will be exceptionally useful for people who want to add custom pixel art and use this tool in conjunction with player and NPC characters you’ve already created for your own project.
Setup from scratch
Documentation: Pixel Character Creator 2D
Table of contents

7.1
Quick recap
Before we continue…
If you haven’t read or watched the previous chapters of the documentation yet, I highly recommend that you do so now. Knowing how this asset functions generally will go a long way in understanding what to do in this section. If you have finished the previous sections, I wish you lots of fun with the customization process!
What you’ll learn in this chapter
Now that you already have a general idea of how the Pixel Character Creator 2D works, you might be wondering: “Well, how do I use this tool with my own art to create my very own custom characters?” That’s what you’re going to learn in this chapter. After reading (and watching) this part of the documentation, you’ll be able to set up the Character Creator 2D entirely from scratch and customize it to your liking.
The first step after importing the project
Before we do anything else, you should navigate to Assets / PixelCharacterCreator2D / OverheadCharacter.
In this folder, you should find a scriptable object called “PixelCharacterCreator2D”. Since we are starting entirely from scratch, feel free to delete that one, and let’s create a brand new Data Manager by right-clicking in the folder and then selecting Create > Game Between The Lines > Character Creator 2D > Data Manager.
With that out of the way, let’s add a character to the Unity Project.
7.2
A free asset to get you started
In case you need a sprite sheet
If you find yourself wanting to try out this ‘setup from scratch’ method, but you somehow don’t have a pixel art character to use, I am gifting you a free pixel art character sprite sheet asset. This asset is free for commercial and non-commercial use and can be downloaded on Itch. Clicking the button below will take you to the informational page for this Asset. There you will also find the link to the Itch page.
Similar to the character sprites that come prepacked with the Pixel Character Creator 2D, these sprites are meant for a top-down perspective. The sprite sheets contain simple sprites for idle and walking animations.
If you use your own artwork
If you have pixel art of your own that you want to use with the Character Creator, please keep in mind that for this tutorial I will be referencing the sample sprite sheet that can be downloaded from Itch. In your case, settings like the size of your sprite sheets and individual sprites may differ from mine. I will mention this whenever necessary so you can adjust your settings to the correct values.
7.3
Prepare your character sprite sheets
Setting up the character sprite parts
Step 1.
Let’s import the character sprite sheets you created (or downloaded) into the Unity Project and place them in a folder that makes sense to you. You can see an example of how I stored the sprites by navigating to Assets > PixelCharacterCreator2D > OverheadCharacter > Templates > TemplateSprites.
Step 2.
Pick either of the character sprite pieces and look at the Texture Import Settings in the inspector. We’re going to edit one of these sprites and then copy our settings onto the other sprites. For the sprite parts we only need to adjust a few settings.
- Firstly, I recommend changing the pixels per unit to match the amount of pixels one unit should represent. You can tinker with this if you like, but I prefer to go with 16 pixels per unit for this character.
- Secondly, I prefer to set “Extrude Edges” to 0, but if you’re consistent you can keep this the default value or change it to something else.
- Next up, go down until you see Read/Write Enabled. Make sure that this boolean is set to true. This is necessary for the Character Creator 2D to read the pixels.
- Since we’re using Pixel Art, set the Filter Mode to “Point (no filter)”.
- Lastly, set Compression to “None” and set the Max Size to be equal to or greater than the largest axis of the sprite sheet. In this case, the largest axis is the y-axis with 128 pixels, so I can select 128 to be the Max Size. These settings will help decrease the size of the sprite whilst maintaining quality.
You can check the image below to see if your inspector window resembles mine. If you’re satisfied, click “Apply”.

Step 3.
Now that we’ve set an example for what our Texture Import Settings for the Sprite pieces should look like, let’s apply these settings to the rest of the sprites we just imported into Unity. We can do this with the help of a Texture Importer Preset. Navigate to the top right on the inspector window, with the Texture Import Settings still opened. Click the ![]() icon and a pop-up window should open. Press the button in the bottom left corner of the window that says “Save current to…”. Save it with a descriptive name so you know what this Texture Importer Preset is meant to represent.
icon and a pop-up window should open. Press the button in the bottom left corner of the window that says “Save current to…”. Save it with a descriptive name so you know what this Texture Importer Preset is meant to represent.
Step 4.
Now open your other Character Sprite Pieces in the inspector and apply the Texture Import Settings we just saved by clicking the ![]() icon and selecting the Texture Imported Preset you just saved. Don’t forget to click “Apply” afterward. All of the Character Sprite Pieces should now have the same settings applied.
icon and selecting the Texture Imported Preset you just saved. Don’t forget to click “Apply” afterward. All of the Character Sprite Pieces should now have the same settings applied.
Alternatively, you could select all of the Character Sprite Pieces at once and edit them all at the same time. However, the reason why I’m doing it this way is because I may add new Character Sprite Pieces later down the line. I would then have to go to the other Sprite Pieces to look at how those are set up, and then change the new sprite’s Import Settings manually. With this method, you can easily skip all of that and just select the Textured Import Settings that you already set up earlier.
Step 5.
We now have to connect these Character Sprite Pieces with the Character Creator 2D. As you’ve learned in Chapter 3.3, you can do so with the help of a Character Segment Database. Feel free to visit that chapter again first if needed. Perform the following steps:
- Create a new Segment Database by selecting Create > Game Between The Lines > Character Creator 2D > Database > Character Segment Database. Do this for the amount of Character Sprite Pieces you imported into the project. For the Blob Character I provided, I’ll create 3 Segment Databases:
- one for the body;
- one for the eyes;
- one for the mouth.
- Add all of the Sprite Pieces to their respective database and give these “Segments” a name to make them recognizable in the Character Creator.
Setting up the Character Template Sprite
Step 1.
Import an example sprite sheet you created (or downloaded) into the Unity Project and place it in a folder that makes sense to you. I’ve put mine in Assets > PixelCharacterCreator2D > OverheadCharacter > Templates > TemplateSprites.
Step 2.
With the example sprite sheet selected, look at the Texture Import Settings in the inspector. We need to adjust the following settings:
- This time, we’ll set the Sprite Mode to “Multiple”. We’re going to slice this sprite sheet into different sprites.
- Change the pixels per unit to match the amount of pixels you set earlier. I’ll go for 16 pixels per unit again.
- Make sure the “Extrude Edges” field matches the value you set before. If you set it at 0, like I did, set that value here as well.
- Set Read/Write Enabled to true again.
- Set Compression to “None” and set the Max Size to the same value as the other sprite sheet you set up earlier.
Check the screenshot below to see if it matches your inspector window. Press “Apply” as soon as you’re done.

Step 3.
Now we’ll have to slice the sprite sheet. Click on the “Sprite Editor” button and slice the sprite sheet into equal parts. There are multiple ways to achieve this, but my preferred method is the following:
- Click on “Slice” in the top left corner and select “Grid By Cell Size”.
- Set the Pixel Size to the size of the individual sprites for your character. For the example character I provided earlier, the width is 16 and the height is 32.
- I prefer setting the Pivot to “Bottom”, but feel free to keep this as the default or change it however you like.
- You can now click the “Slice” Button and click “Apply” in the top right corner.
Step 4.
If you aim to upload other Example Character Sprite Sheets I recommend creating a Texture Importer Preset for this sprite sheet as well. Follow the same steps as before, clicking the ![]() icon and saving these settings as a new Texture Importer Preset.
icon and saving these settings as a new Texture Importer Preset.
The process in this subchapter is scheduled for an update. As soon as a new version of the Pixel Character Creator 2D launches on the Unity Asset Store, this page will be updated with the changes in the patched version.
Setting the Sprite Sheet Export Settings
Open the Character Creator 2D and navigate to the Export Settings window in the left menu. In this window, we are going to set certain settings so they correspond well with our character’s Texture Import Settings. If you need a refresher about the Sprite Sheet Export Settings and what they do, you can read a more detailed explanation of all the values in Chapter 1.4. Without further ado, let’s set all of the settings to match our character:
Sprite Layout In Sheet
- Set the X-value of the Sprite Layout in Sheet (Vector2) to the number of sprites your character’s sprite sheet contains in a horizontal line (row). For the blob character I provided, this amount should be 4, since there are four sprites per row.
- Set the Y-value of the Sprite Layout in Sheet (Vector2) to the number of sprites your character’s sprite sheet has in a vertical line (column). For the blob character, this amount should also be 4, since there are four sprites per row.
Export Sprite Sheet Size
- Set the X-value of the Export Sprite Sheet Size (Vector2) to the width of your sprite sheet. For the blob character I provided, this amount should be 64. This is because there is no offset or padding between the sprites and there are four sprites per row, with each sprite having a width of 16.
- Set the Y-value of the Export Sprite Sheet Size (Vector2) to the height of your sprite sheet. For the blob character I provided, this amount should be 64 as well. This is because there is no offset or padding between the sprites and there are four sprites per column, with each sprite having a height of 16.
Use Power of Two (POT) sizes
- Whether you want to enable this is entirely up to you, but if you want to ensure that sprite sheet outputs are optimized for reduced file sizes, I highly recommend setting this boolean to true.
Default Sprite Preview
- Set the Default Sprite Preview to the front sprite of the example character you created in the previous subsection. This is not a requirement, but this will ensure a better user experience.
Chosen Sprites For Multi-sheet Preview
- This option affects the pose of the character that will be shown during the creation process. I usually go for the idle front sprite of the character but feel free to change this to your linking if you prefer viewing your character from different angles or in different poses.
Preview Sprite Pivot
- To prevent unintended behavior I recommend setting this Vector2 to match the pivots you set for the example character in the previous subsection. I will be setting this value to 0.5 on the X-axis and 0 on the Y-axis because I previously set the pivot of the Blob Character to “Bottom Center” in the Sprite Editor window.
Sprite Sheet Offset
- If your individual character sprites aren’t aligned to the top-left of your character’s sprite sheet, you should set the offset on the X-axis and Y-axis here. Since the Blob Character doesn’t use any offset within the sprite sheet, I will leave both the X and Y-values as 0.
Preview Sprite Pixels per unit
- Set this value to the same amount of Pixels Per Unit you set for your example character’s Texture Import Settings in the previous subchapter.
Transparent Colors
- If your character uses transparent colors in any of its Character Sprite Pieces, those colors should be added here. This will ensure those colors are handled properly with a consistent opacity. Since the Blob Character doesn’t contain any transparent colors, I will leave this list empty.
Your Sprite Sheet Export Settings should now be good to go. I created a screenshot of my settings below, in case you’d like to compare your window to mine.
The process in this subchapter is scheduled for an update. As soon as a new version of the Pixel Character Creator 2D launches on the Unity Asset Store, this page will be updated with the changes in the patched version.
7.4
Prepare a Template Character
Create a Character Prefab
Set up your character as you normally would and create a prefab for it when you’re done. Add anything to this character that you would want to carry over to other characters. If you’re setting up a Player Prefab, add components to it that other players would require, such as a script that handles physics or input. If you’re creating a Prefab meant for NPC characters, think of components that an NPC would need to function, such as a Box Collider 2D and a script allowing for dialogue to trigger. All components and scripts you add to the Character Template will be carried over.
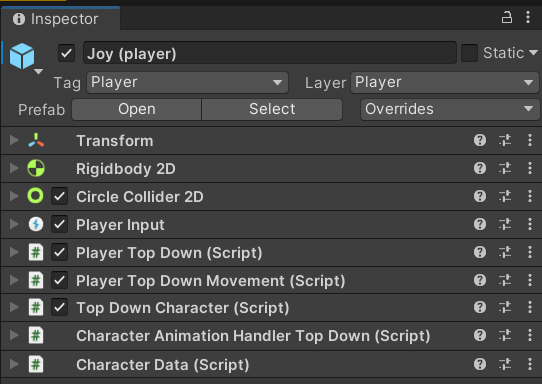
Character Data Script
Usage
The Character Data Script holds any and all significant data regarding the Character you created with the Pixel Character Creator 2D. The purpose of this script is to hold this data in case it is needed for certain in-game logic. A few examples you could use this script for:
- check if the character is wearing a specific type of clothing by retrieving the data from that data cluster;
- retrieve the name of the character;
- turn character animations on or off when needed.
Setup
The Character Data Script can be added manually as a component in the inspector. I recommend adding this script to the Prefab itself and not to any of its children. If you forget to add this script to the Template Character Prefab, the Character Creator 2D will add the script for you automatically. This means setting this script up manually is not required.
The process in this subchapter is scheduled for an update. As soon as a new version of the Pixel Character Creator 2D launches on the Unity Asset Store, this page will be updated with the changes in the patched version.
Sprite Renderer and Animator Components
Sprite Renderer Component
Add a Sprite Renderer to the Character Prefab or one of its children. The Sprite Renderer requires a sprite to be added. It doesn’t matter what sprite this is, as this sprite will be overwritten anyway. Just think of the sprite you add here as a placeholder. This sprite may only show up if an error occurs during the creation process of the character.
Since we’re using Pixel Art, I also recommend adding a new material to the Sprite Renderer with the Shader set to Sprites/Default and “Pixel snap” enabled. In the demo, one such material is also included and added to the characters by default.
Animator Component
Add an Animator Component to the Character Prefab or either of its children. Make sure that the Animator Component is added to the same GameObject as the Sprite Renderer. The Animator Component will also need an attached Animator Controller with Animation Clips. If any of these requirements are forgotten, the Character Creator 2D will throw an Error message to remind you that these steps cannot be skipped.
Add the template character to the Data Manager Scriptable Object
Firstly, go to the Character Data Manager. Within this interface, add a new Character Template Prefab by clicking the  icon. While it’s possible to generate multiple templates, I recommend exercising a bit of restraint and only adding templates that are essential for creating your characters.
Subsequently, assign a descriptive name to the newly added template so its purpose is easily understandable. If you don’t name the template, this will prompt a warning message. However, you can proceed with the creation process despite this.
Next, drag the Template Character Prefab you’ve recently created into the designated “Prefab” slot. If this step is forgotten, this will result in errors throughout the creation process.
Lastly, decide whether the character is intended to function as a player or an NPC. This helps in maintaining organizational coherence with your templates.

7.5
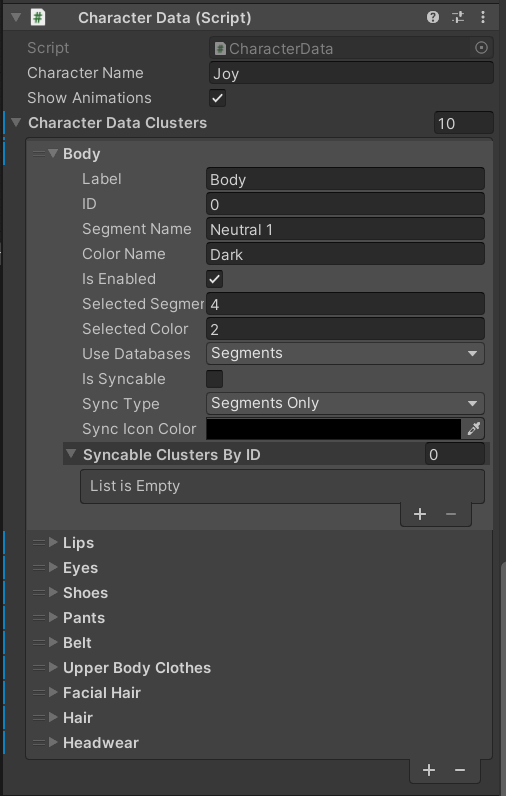
Determining the Data Clusters
Plan ahead
This may sound like a no-brainer, but I assure you it’s beneficial to know how many Data Clusters you will need in advance. In the case of the sample character I provided, I know that I’ll need three Data Clusters:
- a Body Cluster;
- an Eyes Cluster;
- a Mouth Cluster.
If you haven’t created character sprite pieces yet, try to consider how much control you want to have over your character’s design and how much customizability you would want for that character. You can literally make this is as simple or as complex as you’d like, so take a moment to plan things out.
Add a cluster for every customizable part
Access the Character Data Manager Scriptable Object you created a while back and view it in the inspector window. Here, you’ll find an overview of all the Character Data Clusters which should amount to a grand total of 0. Let’s change that…
Select the icon to create 3 new Character Data Clusters. Let’s give these Data Clusters a name while we’re at it. I’ll be naming the clusters “Body”, “Eyes”, and “Mouth” respectively.
Feel free to tinker around with the other settings to achieve your desired outcome. I will leave all three as they are for now and keep the default values. Now, we’ll need to add a few databases to gain control over the character segments and colors.

7.6
Setting up the databases
Segment Databases
First, determine the location to store your new Segment Database. Then, right-click and choose: Create > Database > Character > Segment Database. Create as many Segment Databases as there are Character Data Clusters. In my case, I’ll create three and give them descriptive names to match their purpose in the Character Data Manager. After creating the databases, add segments to the lists and drag the Character Sprite Piece sheets into their corresponding Databases. In the case of the Blob Character, I will show you how I’ve set these Character Segment Databases up.
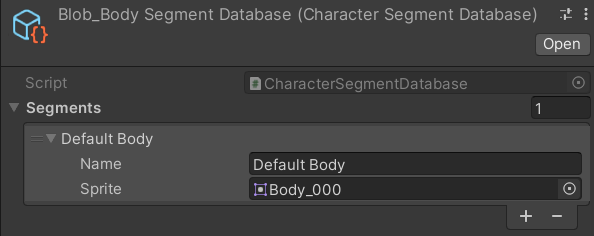

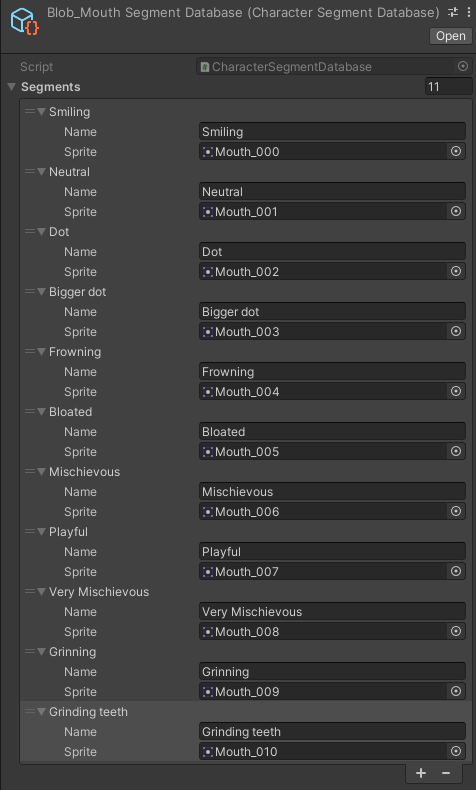
Finally, add the Segment Databases into their corresponding Data Clusters inside of the Character Data Manager.
Color Databases
First, choose a folder to store your new Color Databases. Navigate to the folder of your choosing and right-click and choose: Create> Database> Character > Color Database. Create as many Color Databases as there are Segment Databases. In my case, that’ll be three. Give the databases names that are descriptive enough for you to recognize them with relative ease.
Add a default Color Group
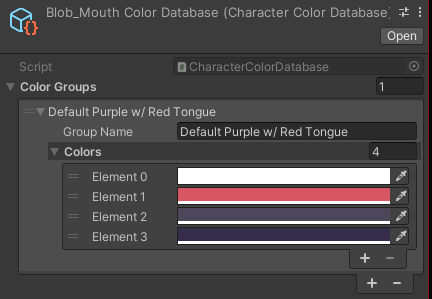
Now, let’s populate the newly created Scriptable Objects with the default Color Groups. Give them a name that describes the default color schemes well enough. We then need to add the hex codes for every color used in the sprite sheets with the Character Sprite Pieces. I recommend using Aseprite or a similar tool to extract hex codes from the image files. If you’re using the Blob Character, like me, I’ve provided the hex codes for the body, eyes, and mouth below for your convenience. Simply copy and paste these hex codes into the color fields and you’re done with the default colors. Don’t forget to set the alpha to 1 for each color.
Hex codes for the Blob Character Body Sprite Pieces
| #BBA7C6 | #A28FAB | #83789E | #666077 | #4D475C | #352D4B | #000000 |
| #BBA7C6 | #A28FAB | #83789E | #666077 |
| #4D475C | #352D4B | #000000 |
Hex codes for the Blob Character Eyes Sprite Pieces
| #FFFFFF | #4D475C | #352D4B | #000000 |
Hex codes for the Blob Character Mouth Sprite Pieces
| #FFFFFF | #D95763 | #4D475C | #352D4B |
The process in this subchapter is scheduled for an update. As soon as a new version of the Pixel Character Creator 2D launches on the Unity Asset Store, this page will be updated with the changes in the patched version.
If you’ve completed this part, this might be a good time to take a quick breather and compare our results. You can view the screenshots below as a reference to see if you’re on the right track.


Add more Color Groups
Now that we’re done with the default colors, let’s add some other color groups so that we can actually change the color of our character. I will add one Color Group per Color Database, just to get the point across, but feel free to add as many as you like. If you’re having trouble coming up with good color palettes, numerous online tools can help you with that. I usually use either of the following tools for this purpose:


Extra hex codes for the Blob Character Body Sprite Pieces
| #14FFC9 | #00D6B2 | #00A689 | #00847D | #035B55 | #004851 | #000000 |
| #14FFC9 | #00D6B2 | #00A689 | #00847D |
| #035B55 | #004851 | #000000 |
Extra hex codes for the Blob Character Eyes Sprite Pieces
| #FFFFFF | #035B55 | #004851 | #000000 |
Extra hex codes for the Blob Character Mouth Sprite Pieces
| #FFFFFF | #EC5206 | #035B55 | #004851 |
After adding your new Color Groups, you should be able to open up the Character Creator 2D and tinker with the character design. You can view my result below.

Saved Designs Databases
If you opened the Character Creator 2D in the previous subsection to test your segments and colors, I assume you saw the same warning message as I did.
If you would like to read the entire explanation of this warning message, you can do so in Chapter 6.2. The gist of it is that we need a Database to store Saved Designs of our character. While solving this warning message and adding Saved Design Databases is optional, I recommend trying this feature out at least once in case you may want to use it in the future.
Let’s add a Saved Designs Database for our character. If you need to freshen up on this feature, you can read the full explanation of Saved Design Databases in Chapter 3.7.
You can create a Saved Designs Database by selecting Create > Game Between The Lines > Character Creator 2D > Database > Saved Designs Database. Again, be sure to choose a folder and name for this database that makes sense to you.
Now add the Saved Designs Database you just created to the Character Data Manager by dragging it into the correct empty slot. Since we’ve only added segments and colors for the Body Window, we only need to add a Saved Designs Database to the Saved Body Designs slot. The other slot can remain empty since the Clothing Window is currently unused. After adding the Saved Body Designs Database, the warning message we previously received should now have disappeared.

7.7
Preparing Character Animations
Template Animations & Animator Controller
If you’ve followed along with the steps in Chapter 7.4, you should already have a template character with an Animator Controller Component ready for use. Now’s the time to animate your character if you haven’t done so already. Be sure to save the Animation Clips and Animator Controller of your Template Character in a place that makes sense to you.
Give the Template Character as many animations as you desire. If you’re using the Blob Character I provided, you should be able to add an Idle Animation and Walking Animation in four directions.
Fetch the Animation Data from the Template Character
Open the Character Creator 2D and navigate to the Export Settings window in the left menu. In this window, we need to scroll down to the “Animation Export Settings” section. There, we need to click the button that says “Fetch data from Runtime Animator Controller“. If you need a reminder of what this does, you can read more about it in Chapter 5.2.
After pressing the button, the Template Animation Data will have been extracted from the Template Character’s Runtime Animator Controller. Go through the list of Template Character Animations to check if everything was carried over correctly. You can edit some of these values as well, but I’d rather recommend changing settings in your Template Character’s Animation Clips themselves if needed.
7.8
Try it out!
Have you followed along with the entire instruction? If you did, let’s try it out! Open the Character Creator 2D and try to create a Character of your own design. I have created a few Blob Characters below to give you an idea of the output you can expect.

Are you encountering unresolved warnings or bugs? In that case, I recommend visiting Chapter 6 again and checking whether your problem is covered there. If it isn’t, feel free to send me a message via my E-mail or the designated contact form.